A Guide Into Logging in Node.js using Winston

I'm a software developer with a life goal of using technology as a tool for solving problems across major industries.
Published on

In this article, we will go in-depth into the concept of logging, specifically in the context of building Node.js applications. We'll look at the importance of logging and various mechanisms we can leverage to simplify the process of creating and managing application logs by using a library called Winston. We'll also look at different transport mechanisms commonly used, and finally, we'll learn how to send application logs to Amazon's CloudWatch. With that said, let's start by looking into the concept of logging.
Prerequisite
There will be practical implementations in later sections of this article, and therefore to follow along, you will need to have a basic understanding of Node.js and JavaScript. You will also need to have both Node.js and the NPM package manager installed locally. If you don't have these packages, you can download them here (NPM comes bundled with Node.js)
What Is Logging
In the simplest of terms, logging is the act of keeping logs. A log is typically a file that contains information about events that occurred during a specific operation and at a particular time (usually timestamped for traceability). For example, in backend applications that expose API endpoints, as clients make requests to these endpoints, certain events occur, such as retrieving user data, creating users, etc. There is also a possibility of errors occurring; Logs can help us keep track of certain events and the time they took place; this information can be tremendously helpful for diagnosis and debugging later on.
The Importance of Logging
Debugging/Error Tracking
Using a simple example: We've just developed and deployed to production a backend application that exposes an API endpoint for signing up users. However, at some point, the server crashes when new users try to sign up, and no one knows why. If we incorporated logging, there's a chance that we can review the logs and trace the specific events that occurred leading up to that crash; this gives us more information on what may have led to that crash and, therefore, helps with debugging and tracing down the source.
Statistical analysis
One significant benefit of logging is being able to perform audits on stored logs in a production system. We can leverage cloud-based services like Splunk to analyze and provide real-time visualizations of the application logs.
Performance tracking
We can collect and store information on how long specific API endpoints take to respond to client requests through logs. This helps the developers easily spot performance-related problems and possibly aids them in troubleshooting these issues. In the Node.js community, a popular package called Morgan helps with this by working as an HTTP request logger middleware.
The need to ditch normal console.log for advanced tools and libraries
One of the most popular ways to log information in Node.js applications is through the console.log method. However, there are severe limitations, especially when using this in a production environment; let's look at a few:
- Console.log (console. warn, console. error) uses stderr internally to write messages to the terminal; this is a problem because stderr performs its operations in a synchronous and blocking way. This can lead to performance issues when logging a large amount of data, as such calls can block the event loop.
- Due to the fact messages are logged directly onto the terminal, we lose valuable information if the server crashes or even restarts, as there's no way of persisting logs to more durable storage.
- In logging libraries, there is the concept of Transports which are storage mechanisms for logs, e.g., File transport: which means we can store logged information in a file. console.log provides no such features as it permanently prints messages onto the terminal and offers no way to use a different transport mechanism.
As a result, we will look at a library that is more robust and suitable for the complexities of a production environment. There are many logging libraries in the JavaScript ecosystem, but we'll focus on a library called Winston. Let's get into that next.
What is Winston
Winston is a flexible logging library that supports multiple transport and storage mechanisms. It is flexible because different parts required in the logging process are decoupled and can be added dynamically, therefore providing some extensibility, as we'll see later on.
There are a variety of transport mechanisms supported natively by Winston: File, Console, Stream, HTTP. These transports use the Networking and File I/O functionality provided by core Node.js APIs.
- The File transport mechanism sends logs to a specified file through a Node.js writable stream. This transport uses the Node.js fs module internally (this ensures that it performs operations asynchronously and in a non-blocking manner)
- The Console transport sends log messages directly to the console or terminal. We would typically use this type of transport only in development environments.
- The HTTP transport provides a way to send logs to a remote endpoint URL.
- The Stream transport provides a way to write logs to an existing output stream.
Winston allows us to set up multiple transports in a single logger instance and then send logs of different levels to specific transports, e.g., We can send error logs to a remote endpoint URL while writing info logs to a local file.
There are a couple of other transport mechanisms provided by the community. One of them allows us to stream logs remotely to Amazon CloudWatch; We'll see how to set this up later.
Different Log Levels For Different Use Cases
Log levels are used to categorize log messages by their severity or importance. Each level provides specific meaning and should be used for logging messages in particular contexts or use cases. By default, Winston uses log levels defined by the npm; the alternative is to use custom log levels provided by the RFC147 standard, commonly called Syslog levels.
Let's take a look at the most commonly used logging levels:
- Error: logs application errors that unexpectedly caused the application to fail or crash. In HTTP terms - errors that caused a 500 internal server error.
- Warn: logs runtime errors - not enough to cause the application to crash but should certainly be reviewed and fixed as soon as possible.
- Info: logs information about the competition of specific events in the application, e.g., if a record is added to the database, retrieved from the database, sent a notification, etc.
- Debug: logs diagnostic information, particularly helpful for debugging in development environments.
There are also levels like verbose, silly, and http, but most backend applications use the above log levels. With that covered, let's set up the Winston library and then look at how to implement various transport mechanisms practically.
Setting up the Winston Library
The first thing to do is to install the Winston library from npm:
A Winston logger instance typically takes in 6 properties:
- level: Logs messages only if they are equal to the log level specified or above in terms of severity. e.g., If we set this to a level of "debug," then this instance will also log messages with a level of "info," "warn," and "error."
- levels: represents log priorities. It defaults to standard log levels used by npm.
- format: provides a custom way to define the formatting of log messages. By default, logged messages are formatted in JSON.
- transports: takes in an array of transport mechanisms.
- exitOnError: specifies whether handled exceptions should cause the program to exit.
- silent: specifies whether all log messages should be suppressed.
The code snippet below contains a basic setup of a Winston logger instance:
The code snippet above contains the setup of a Winston logger instance and two registered transports. Let's look at specific parts of the code and examine what functionality they provide:
The snippet above contains the initialization of a Winston logger instance; it takes in properties outlined earlier. Here we specify the log level for this specific logger instance using the npm log level standard explained earlier.
Through the transports property, we can register all the transports we want to use; instead, we specified an empty array because Winston also provides a way to add multiple transports dynamically rather than during initialization. This provides benefits such as using different transports for different environments or under specific scenarios.
The code snippet above shows how to register multiple transports onto a single logger instance using the add method. The console transport logs messages directly to the console. We use the format property to define how log messages are printed onto the console. We can combine several format methods using the combine method. For example, through the format combination above, the log messages are printed onto the console in this format: ${info.timestamp} ${info.level}: ${info.message} e.g
Winston provides a plethora of format options available here.
The file transport stores log messages in a file called "demo.log." If this file is non-existent, then it is automatically created. New log messages are continuously added to the file until it reaches a maximum size specified by the maxSize option, in which case it creates a new file. We can find all available options the file transport accepts. We can then use this logger instance all over the application through the .log method e.g
Whenever this method: logger.log('info', 'Successfully setup logger instance'); is executed, a new log message is printed onto the terminal and added to the "demo.log" file.
Using different storage and transport mechanisms (for dev and prod environments)
Ideally, we would use different transports for development and production environments. Sometimes the transport can be the same, but the configuration might differ for each environment. Assuming we want to use the same file and console transport setup for development - one way to do this is by using environmental variables provided in Node's global process. In the code snippet below, we register the file and console transports only when in development environments:
Next, we'll look at how to send logs to Amazon CloudWatch and register this transport for use in only production environments.
Sending Logs to Cloud Services such as Amazon CloudWatch
This section will look at setting up a transport that allows us to send logs to Amazon CloudWatch.
The first thing is to register a personal AWS account and create new credentials - an access key id and a secret access key. Skip this step if you already have existing security credentials; otherwise, follow the steps below to create new security credentials:
- Log Into your AWS IAM console.
- On the navigation menu, click on your Username and select Security Credentials.

- Click on the Access keys (access key ID and secret access key) tab and click on Create New access key.
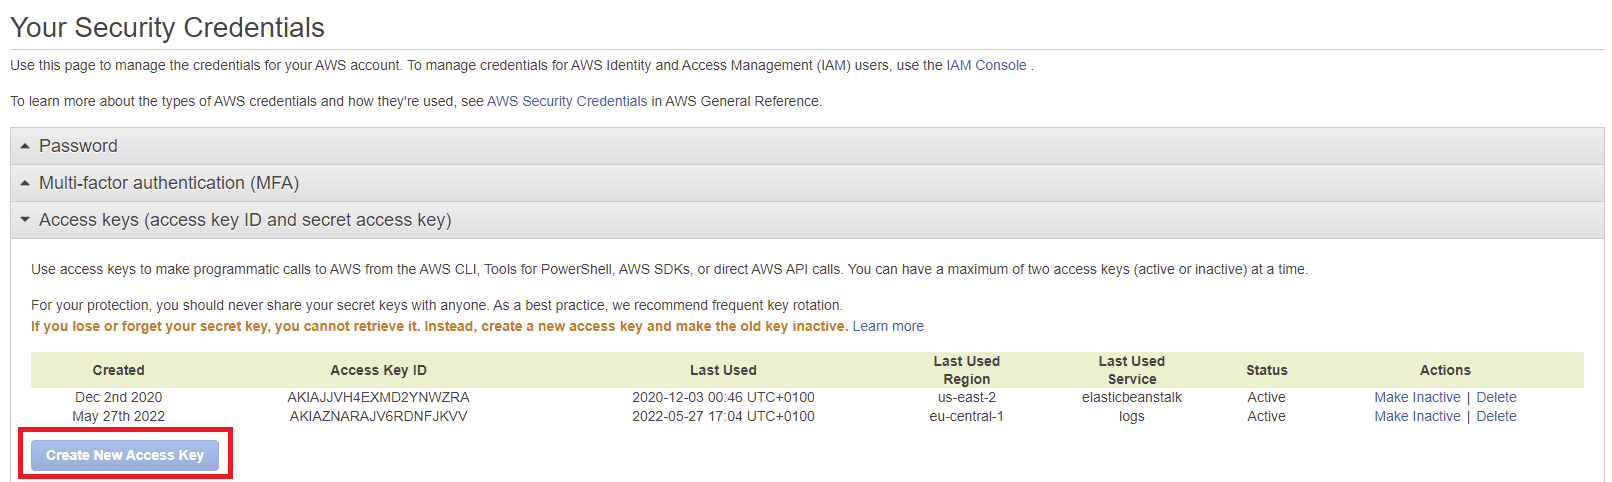
A new access key Id and secret access key should be created, copy this or download the file containing these credentials.
Let's install a library that lets us add a transport to a Winston logger instance specifically for sending logs to CloudWatch.
Run the following code in the terminal:
Then we can create a new transport and add that to an existing Winston logger instance. The code snippet below shows how to do this.
In the code snippet above, we use the environment variable to ensure that we only register this transport to send logs to Amazon CloudWatch when the application is in a production environment. The logGroupName property specifies which CloudWatch group logs should be written to, while logGroupStream sets which CloudWatch stream logs should be sent. The awsConfig property is an object containing the AWS security credentials.
That's all the configuration needed, so If we log messages in production mode, they'll automatically be sent to CloudWatch. Try to log some messages and head over to the CloudWatch Console. You should be able to see something like this:

Conclusion
In this article, we've been able to look at the concept of logging in general, the importance of logging in building backend applications specifically, and the need for an advanced logging library. Then we looked at how to set up a logging library called Winston. Finally, we were able to go through various transport mechanisms we can use for logging in dev environments and how to send logs to Amazon CloudWatch in production environments.
Data-rich bug reports loved by everyone
Get visual proof, steps to reproduce and technical logs with one click


Continue reading


Put your knowledge to practice
Try Bird on your next bug - you’ll love it
“Game changer”
Julie, Head of QA


Overall rating: 4.7/5
Try Bird later, from your desktop